How to setup a Github repository for a Unity project ?
unity, tutorial, git ·What is git/Github ?
You probably heard about git and/or Github during your programming journey and maybe also probably became a bit intimidated whilst trying to use that.
But, they are powerful tools that you should use and that can be simply used. And yes, I said they.
A funny technique to remember the difference between git and Github is from an answer from a Reddit post asking the same question : “It’s the same as the difference between porn and PornHub”.
It’s silly but it’s true: “porn” is the medium, “PornHub” is the platform. The same way that “git” is the tool and “Github” is the platform.
Git is a “version control system” created by Linus Torvald (the guy who made Linux, the most used OS in the world) : it looks at the files in a project, take notes of the differences between the last version and the current one, and save that.
Github is like a hosting service for repositories (the name given to git projects) to be able to access projects online. You don’t even have to use Github, as there is a lot of other platforms like GitLab. You can even host your own platform with stuff like Gitea for example.
Installing git
To install git, you have to go on the official website: https://git-scm.com/
You can click the big “Install for Windows” (or your OS) button located on the main page which will send you to the download page.

Click on “Click here to download”, it will download the installer for git. Launch the installer and go through each step without touching anything except when you get to :

You could skip it like everything else, but I like to override the default branch name to “main” instead of using “master”.
Then you can continue without touching any settings. Once the installation is done, you can open a command line prompt to check if it worked by doing git -v or git -version:

Installing Github Desktop
To prevent having to use a command line prompt everytime, which is a bit annoying and scary for beginners, we will install a tool that will give us a more user-friendly interaction.
Start by going to this link: https://desktop.github.com/download/
And download for your platform :

Follow the installation steps. They’ll ask you to sign in to your Github account. If you don’t already have one, create an account for free then connect.

The application will open like this. Now, we can actually setup.
How to setup git on your Unity project ?
Now for the interesting part. Of course, you’ll have to create a Unity project if you haven’t have one yet. Once that’s done, open the project folder in your file explorer.
We will have to open the command line prompt a second time, inside of our project this time (you can navigate using cd "C:/path/to/project") and doing git init. This command will initialize git inside your project.
Great! Now we can start using Github Desktop. During your first time using the app, since you don’t have any local repository yet, you can add the project by pressing this:
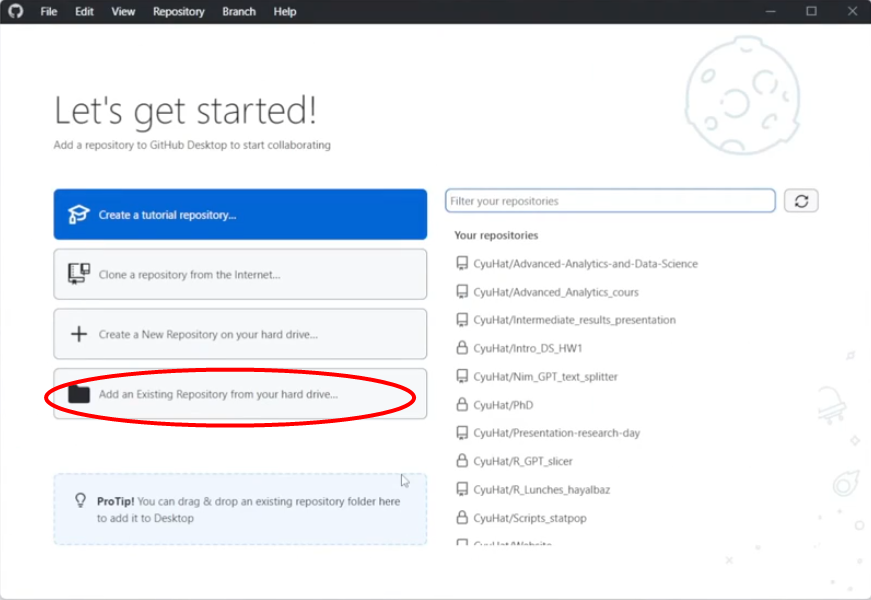
Once you have at least one project, you’re gonna have to use the “Add” button:

After adding your project, it will open this interface (I’m using this blog repository as an example):
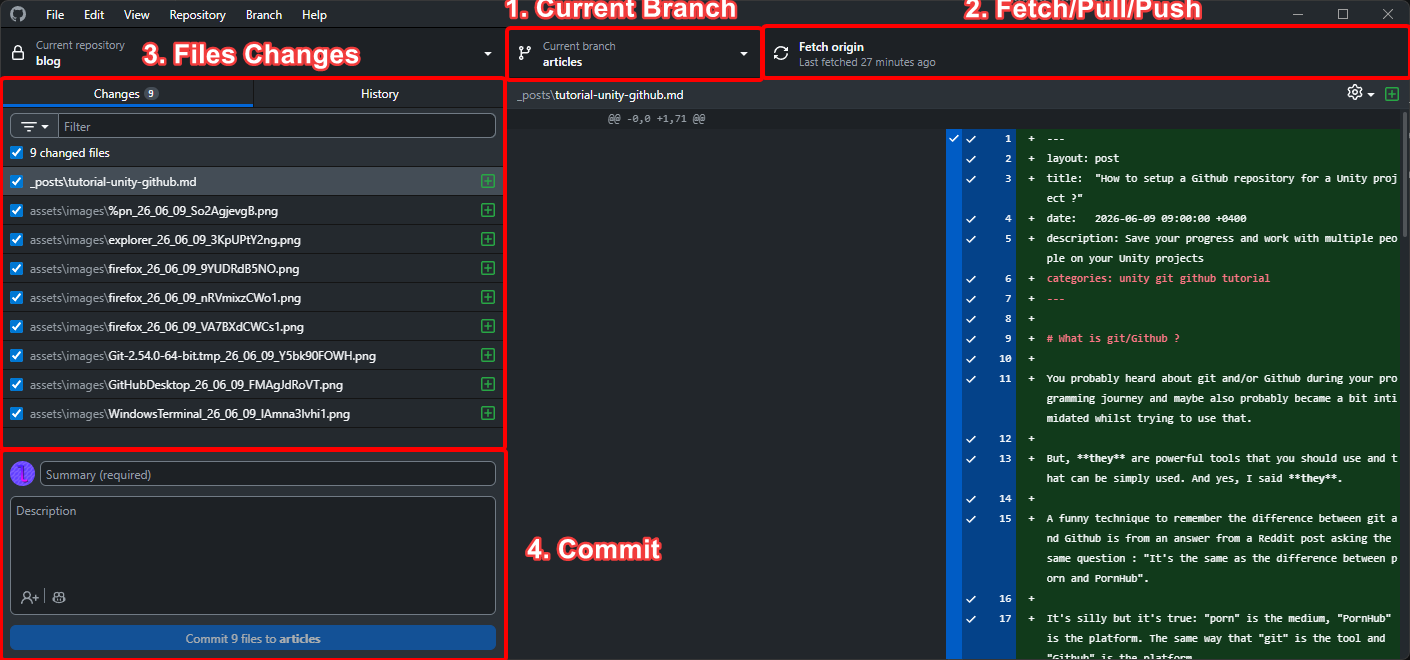
There are 4 elements that seem important (to me):
- Current Branch: Branches are an history of commits, you can have a bunch of them when working on different features. It’s also very much appreciated when working with multiple people (working in the same branch will cause issues).
- Fetch/Pull/Push: Those are actions that will enable you to get (pull) from the remote (online) repository and send (push) to the remote repository.
- Files Changes: This is self explanatory. It will list all the files that were added, removed, moved or modified.
- Commit: A commit is like a snapshot, a collection of file changes. You have to give it a summary, and you can also have a longer description.
You will notice that you have a bunch of files, which is perfect to make your first commit. Inside the summary, input Initial commit to indicate this is the first commit in your history (you can put whatever you want tho).
Press “Commit”. You’ll notice that on the top right, the button is called “Publish repository”. It’s because we don’t have a remote repo yet.

It will open a modal box where you can add a name for the repository (it will usually use the folder name, I recommand putting everything in lowercases with “-“ dashes in lieu of spaces) and a small description. You can press “Publish repository”.
Awesome! Your repo is now available on Github. You can access it by right-clicking on the “Current repository” dropdown menu on the top left and then selecting “View on Github” which will open the web page for your repo. If you see a 404 error, that means that the code is private and your not connected. Just log in to your Github account and refresh the page, it will work as intended.
From now on, it will be the same thing, code some stuff, commit and push to the current branch.
Branches
Like said previously, branches are collections of commits. They are very useful when you have to work on a specific feature or bugfix without causing issue on the main branch, especially when working with multiple people. You do not want to work on the same branch most of the time, and you want to avoid working on the main branch only. Why is that?
In case you have an issue with a feature, and you need to roll back to a previous version of the project you can always “checkout” to a commit. But let’s say you have a commit history like this:
- Implementing feature A
- Implementing feature B
- Trying to fix feature A
You implemented Feature A but while implementing Feature B, you made some modifications that weren’t related and moreover caused issues to Feature A. You tried to fix it, but it doens’t work. You can always checkout to your commit Implementing feature A, but you will lose what you did on Implementing feature B.
Also, if you work with a team, commiting on the same branch will cause merge conflicts if you modify the same thing.
NOTE: On projects, especially using Unity, you WILL have merge conflicts. However, you can prevent dumb conflicts that will require you to checkout to a previous commit and make everyone lose their progress.
Click on current branch, which will open a dropdown menu. You have a button “Add” where you can create a new branch.
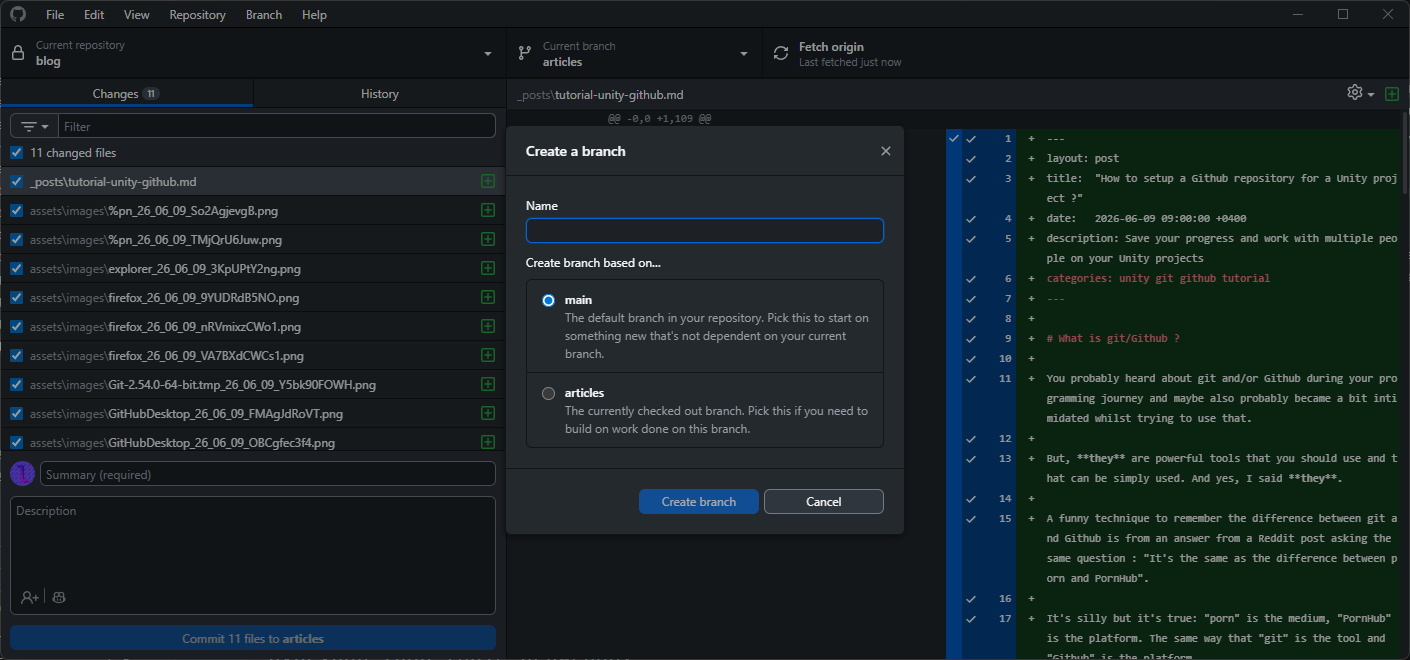
When you’re in another branch than the main one, it will ask you whether you want to base your new branch on the main (or master) branch or your current branch.
At the bottom of the branch dropdown menu, you will also find a button “Choose a branch to merge into
Merges are, like the name imply, a way to fuse two branches together. The commits will follow the same timeline. This is useful when you need features that have been added to other branches inside yours.
This is why “Fetch origin” in the top right is important. Fetch will gather all changes in the different branches, you will need to do that before merging other branches into yours.
In case there are merge conflicts, Github Desktop will try to show you a modal with the list of conflicting elements and give you options to fix them. For text files, you can modify them and keep the lines you want to. For other binary assets (audio files, textures/images, etc.) you can choose which branch version you want to keep.
Conclusion
This is the basics of git, Github and Github Desktop. This tutorial can be applied to almost any project, because the Unity part wasn’t really present and that’s the point.
There are slightly more complex topics such as pull requests which is kinda important that we’ll tackle at a later date.
From there though, I assume you are able to create a git repository and commit your changes. You can also do some research to find out how to get a project to another device (look up git clone for more).